AudioSelect:到底是在选择什么?
你好,我是朱涛。今天我们来学习 Kotlin 协程的 select。
select,在目前的 Kotlin 1.6 当中,仍然是一个实验性的特性(Experimental)。但是,考虑到 select 具有较强的实用性,我决定还是来给你介绍一下它。
select 可以说是软件架构当中非常重要的一个组件,在很多业务场景下,select 与 Deferred、Channel 结合以后,在大大提升程序的响应速度的同时,还可以提高程序的灵活性、扩展性。
今天这节课,我会从 select 的使用角度着手,带你理解 select 的核心使用场景,之后也会通过源码帮你进一步分析 select API 的底层规律。学完这节课以后,你完全可以将 select 应用到自己的工作当中去。
好,接下来,我们就一起来学习 select 吧!
select 就是选择“更快的结果”
由于 select 的工作机制比较抽象,我们先来假设一个场景,看看 select 适用于什么样的场景。
客户端,想要查询一个商品的详情。目前有两个服务:缓存服务,速度快但信息可能是旧的;网络服务,速度慢但信息一定是最新的。
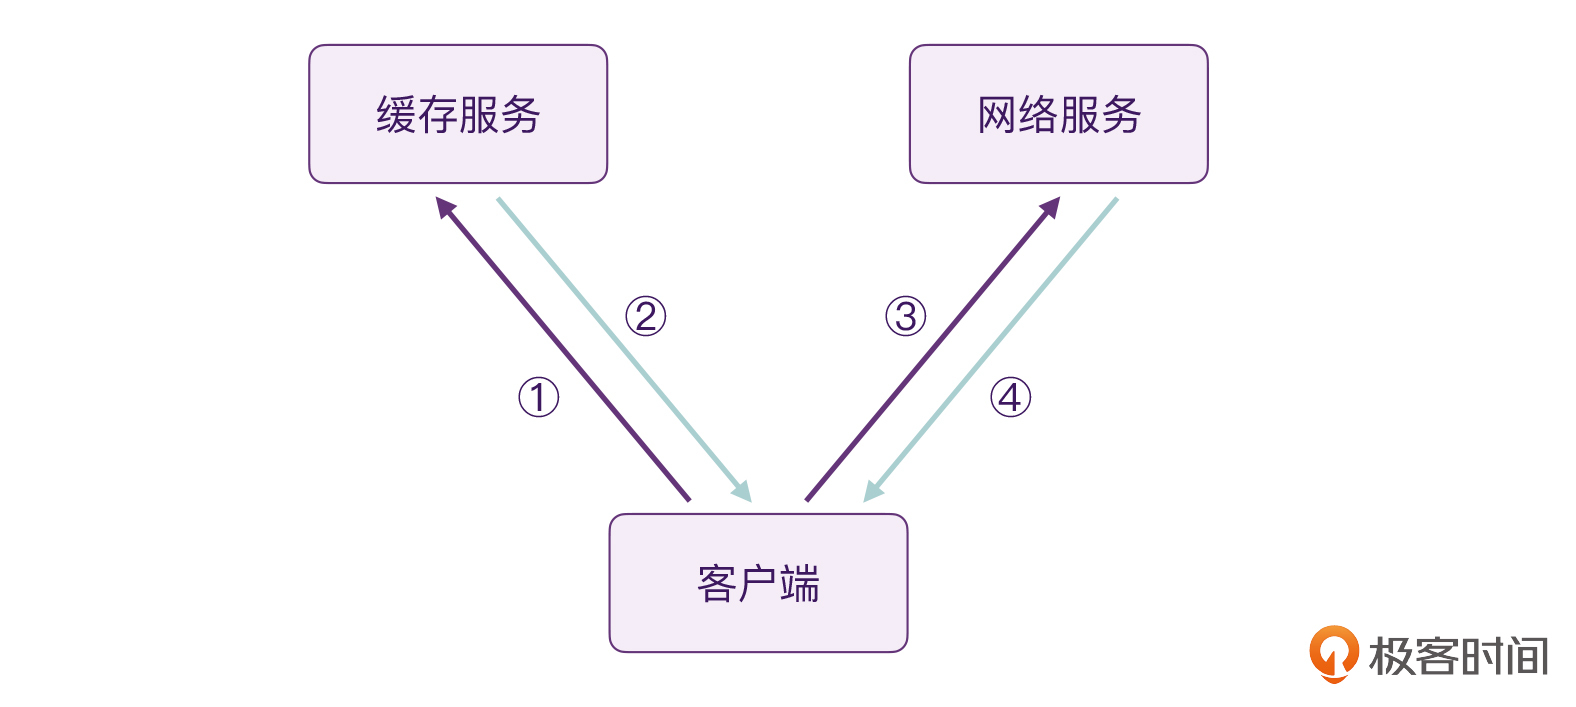
对于这个场景,如果让我们来实现其中的逻辑的话,我们非常轻松地就能实现类似这样的代码逻辑:
// 代码段1
fun main() = runBlocking {
    suspend fun getCacheInfo(productId: String): Product? {
        delay(100L)
        return Product(productId, 9.9)
    }

    suspend fun getNetworkInfo(productId: String): Product? {
        delay(200L)
        return Product(productId, 9.8)
    }

    fun updateUI(product: Product) {
        println("${product.productId}==${product.price}")
    }

    val startTime = System.currentTimeMillis()

    val productId = "xxxId"
    // 查询缓存
    val cacheInfo = getCacheInfo(productId)
    if (cacheInfo != null) {
        updateUI(cacheInfo)
        println("Time cost: ${System.currentTimeMillis() - startTime}")
    }

    // 查询网络
    val latestInfo = getNetworkInfo(productId)
    if (latestInfo != null) {
        updateUI(latestInfo)
        println("Time cost: ${System.currentTimeMillis() - startTime}")
    }
}

data class Product(
    val productId: String,
    val price: Double
)

/*
输出结果
xxxId==9.9
Time cost: 112
xxxId==9.8
Time cost: 314
*/
考虑到缓存服务速度更快,我们自然而然会这么写,先去查询缓存服务,如果查询到了信息,我们就会去更新 UI 界面。之后去查询网络服务,拿到最新的信息之后,我们再来更新 UI 界面。也就是这样:
第一步:查询缓存信息;
第二步:缓存服务返回信息,更新 UI;
第三步:查询网络服务;
第四步:网络服务返回信息,更新 UI。
这种做法的好处在于,用户可以第一时间看到商品的信息,虽然它暂时会展示旧的信息,但由于我们同时查询了网络服务,旧缓存信息也马上会被替代成新的信息。这样的做法,可以最大程度保证用户体验。
不过,以上整个流程都是建立在“缓存服务一定更快”的前提下的,万一我们的缓存服务出了问题,它的速度变慢了,甚至是超时、无响应呢?
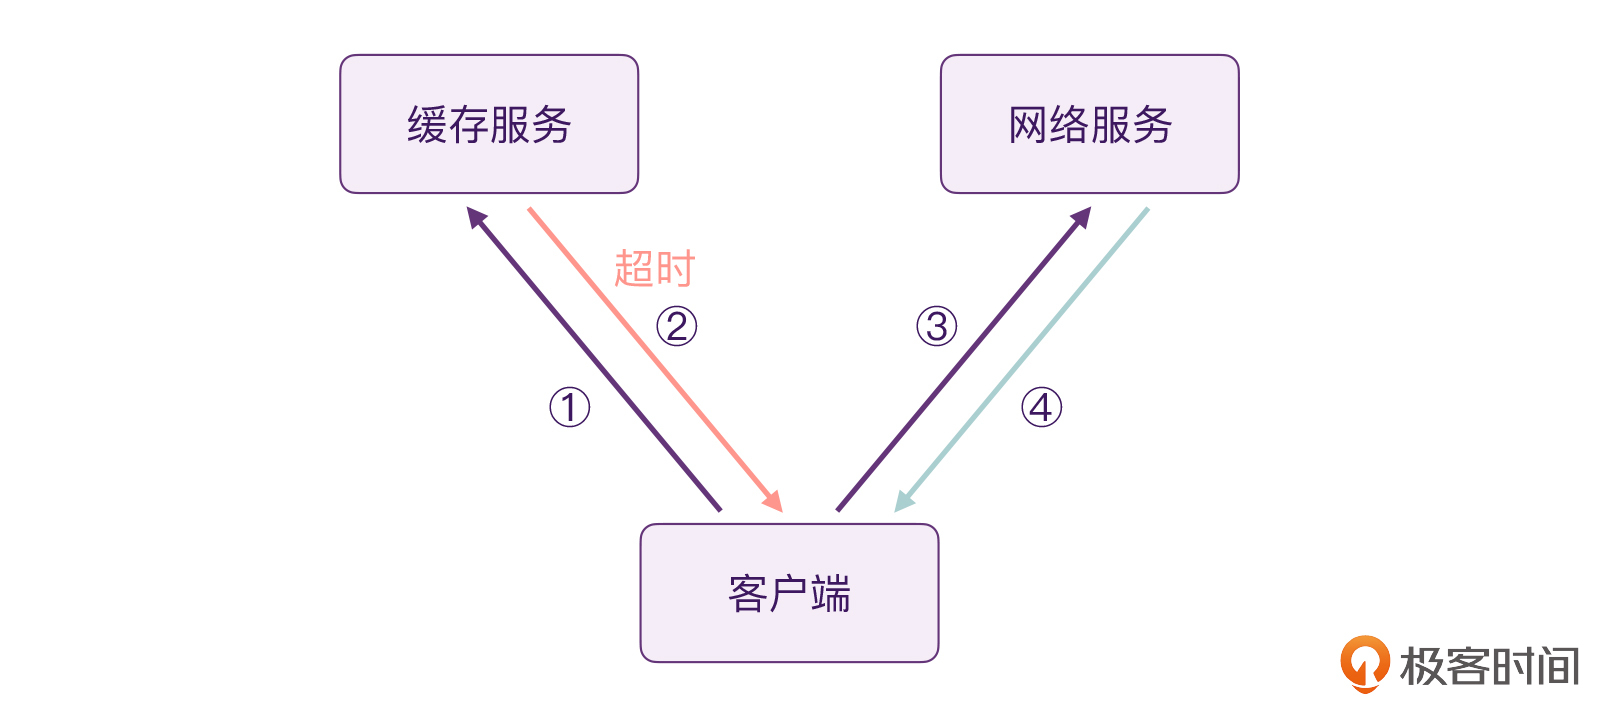
这时候,如果你回过头来分析代码段 1 的话,你就会发现:程序执行流程会卡在第二步,迟迟无法进行第三步。具体来说,是因为 getCacheInfo() 它是一个挂起函数,只有这个程序执行成功以后,才可以继续执行后面的任务。你也可以把 getCacheInfo() 当中的 delay 时间修改成 2000 毫秒,去验证一下。
/*
执行结果:
xxxId==9.9
Time cost: 2013
xxxId==9.8
Time cost: 2214
*/那么,面对这样的场景,我们其实需要一个可以灵活选择的语法:“两个挂起函数同时执行,谁返回的速度更快,我们就选择谁”。这其实就是 select 的典型使用场景。
select 和 async
上面的这个场景,我们可以用 async 搭配 select 来使用。async 可以实现并发,select 则可以选择最快的结果。
让我们来看看,代码具体该怎么写。
// 代码段2
fun main() = runBlocking {
    val startTime = System.currentTimeMillis()
    val productId = "xxxId"
    //          1,注意这里
    //               ↓
    val product = select<Product?> {
        // 2,注意这里
        async { getCacheInfo(productId) }
            .onAwait { // 3,注意这里
                it
            }
        // 4,注意这里
        async { getNetworkInfo(productId) }
            .onAwait {  // 5,注意这里
                it
            }
    }

    if (product != null) {
        updateUI(product)
        println("Time cost: ${System.currentTimeMillis() - startTime}")
    }
}

/*
输出结果
xxxId==9.9
Time cost: 127
*/
从上面的执行结果,我们可以看到,由于缓存的服务更快,所以,select 确实帮我们选择了更快的那个结果。代码中一共有四个注释,我们一起来看看:
注释 1,我们使用 select 这个高阶函数包裹了两次查询的服务,同时传入了泛型参数 Product,代表我们要选择的数据类型是 Product。
注释 2,4 中,我们使用了 async 包裹了 getCacheInfo()、getNetworkInfo() 这两个挂起函数,这是为了让这两个查询实现并发执行。
注释 3,5 中,我们使用 onAwait{} 将执行结果传给了 select{},而 select 才能进一步将数据返回给 product 局部变量。注意了,这里我们用的 onAwait{},而不是 await()。
现在,假设,我们的缓存服务出现了问题,需要 2000 毫秒才能返回:
// 代码段3
suspend fun getCacheInfo(productId: String): Product? {
    // 注意这里
    delay(2000L)
    return Product(productId, 9.9)
}

/*
输出结果
xxxId==9.8
Time cost: 226
*/
这时候,通过执行结果,我们可以发现,我们的 select 可以在缓存服务出现问题的时候,灵活选择网络服务的结果。从而避免用户等待太长的时间,得到糟糕的体验。
不过,你也许发现了,“代码段 1”和“代码段 2”其实并不是完全等价的。因为在代码段 2 当中,用户大概率是会展示旧的缓存信息。但实际场景下,我们是需要进一步更新最新信息的。
其实,在代码段 2 的基础上,我们也可以轻松实现,只是说,这里我们需要为 Product 这个数据类增加一个标记。
// 代码段4
data class Product(
    val productId: String,
    val price: Double,
    // 是不是缓存信息
    val isCache: Boolean = false
)
然后,我们还需要对代码段 2 的逻辑进行一些提取:
// 代码段5
fun main() = runBlocking {
    suspend fun getCacheInfo(productId: String): Product? {
        delay(100L)
        return Product(productId, 9.9)
    }

    suspend fun getNetworkInfo(productId: String): Product? {
        delay(200L)
        return Product(productId, 9.8)
    }

    fun updateUI(product: Product) {
        println("${product.productId}==${product.price}")
    }

    val startTime = System.currentTimeMillis()
    val productId = "xxxId"

    // 1,缓存和网络,并发执行
    val cacheDeferred = async { getCacheInfo(productId) }
    val latestDeferred = async { getNetworkInfo(productId) }

    // 2,在缓存和网络中间,选择最快的结果
    val product = select<Product?> {
        cacheDeferred.onAwait {
                it?.copy(isCache = true)
            }

        latestDeferred.onAwait {
                it?.copy(isCache = false)
            }
    }

    // 3,更新UI
    if (product != null) {
        updateUI(product)
        println("Time cost: ${System.currentTimeMillis() - startTime}")
    }

    // 4,如果当前结果是缓存,那么再取最新的网络服务结果
    if (product != null && product.isCache) {
        val latest = latestDeferred.await()?: return@runBlocking
        updateUI(latest)
        println("Time cost: ${System.currentTimeMillis() - startTime}")
    }
}

/*
输出结果:
xxxId==9.9
Time cost: 120
xxxId==9.8
Time cost: 220
*/
如果你对比代码段 1 和代码段 5 的执行结果,会发现代码段 5 的总体耗时更短。
另外在上面的代码中,还有几个注释,我们一个个看:
首先看注释 1,我们将 getCacheInfo()、getNetworkInfo() 提取到了 select 的外部,让它们通过 async 并发执行。如果你还记得第 16 讲思考题当中的逻辑,你一定可以理解这里的 async 并发。(如果你忘了,可以回过头去看看。)
注释 2,我们仍然是通过 select 选择最快的那个结果,接着在注释 3 这里我们第一时间更新 UI 界面。
注释 4,我们判断当前的 product 是不是来自于缓存,如果是的话,我们还需要用最新的信息更新 UI。
然后在这里,假设我们的缓存服务出现了问题,需要 2000 毫秒才能返回:
// 代码段6
suspend fun getCacheInfo(productId: String): Product? {
    // 注意这里
    delay(2000L)
    return Product(productId, 9.9)
}

/*
输出结果
xxxId==9.8
Time cost: 224
*/
可以看到,代码仍然可以正常执行。其实,当前的这个例子很简单,不使用 select 同样也可以实现。不过,select 这样的代码模式的优势在于,扩展性非常好。
下面,我们可以再来假设一下,现在我们有了多个缓存服务。
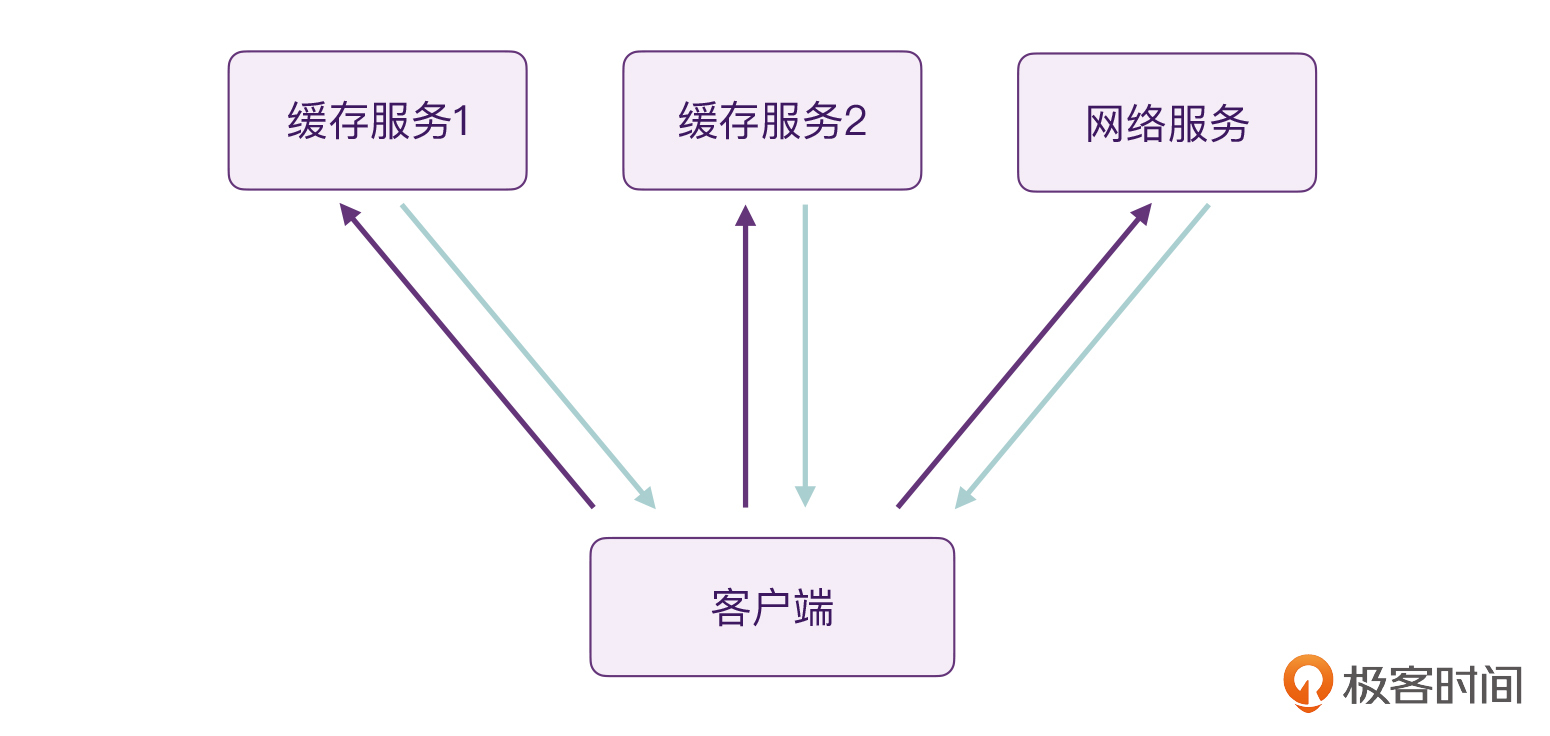
对于这个问题,我们其实只需要稍微改动一下代码段 3 就行了。
// 代码段7
fun main() = runBlocking {
    val startTime = System.currentTimeMillis()
    val productId = "xxxId"

    val cacheDeferred = async { getCacheInfo(productId) }
    // 变化在这里
    val cacheDeferred2 = async { getCacheInfo2(productId) }
    val latestDeferred = async { getNetworkInfo(productId) }

    val product = select<Product?> {
        cacheDeferred.onAwait {
            it?.copy(isCache = true)
        }

        // 变化在这里
        cacheDeferred2.onAwait {
            it?.copy(isCache = true)
        }

        latestDeferred.onAwait {
            it?.copy(isCache = false)
        }
    }

    if (product != null) {
        updateUI(product)
        println("Time cost: ${System.currentTimeMillis() - startTime}")
    }

    if (product != null && product.isCache) {
        val latest = latestDeferred.await() ?: return@runBlocking
        updateUI(latest)
        println("Time cost: ${System.currentTimeMillis() - startTime}")
    }
}

/*
输出结果
xxxId==9.9
Time cost: 125
xxxId==9.8
Time cost: 232
*/
可以看到,当增加一个缓存服务进来的时候,我们的代码只需要做很小的改动,就可以实现。
所以,总的来说,对比传统的挂起函数串行的执行流程,select 这样的代码模式,不仅可以提升程序的整体响应速度,还可以大大提升程序的灵活性、扩展性。
select 和 Channel
在前面的课程我们提到过,在协程中返回一个内容的时候,我们可以使用挂起函数、async,但如果要返回多个结果的话,就要用 Channel 和 Flow。
那么,这里我们来看看 select 和 Channel 的搭配使用。这里,我们有两个管道,channel1、channel2,它们里面的内容分别是 1、2、3;a、b、c,我们通过 select,将它们当中的数据收集出来并打印。
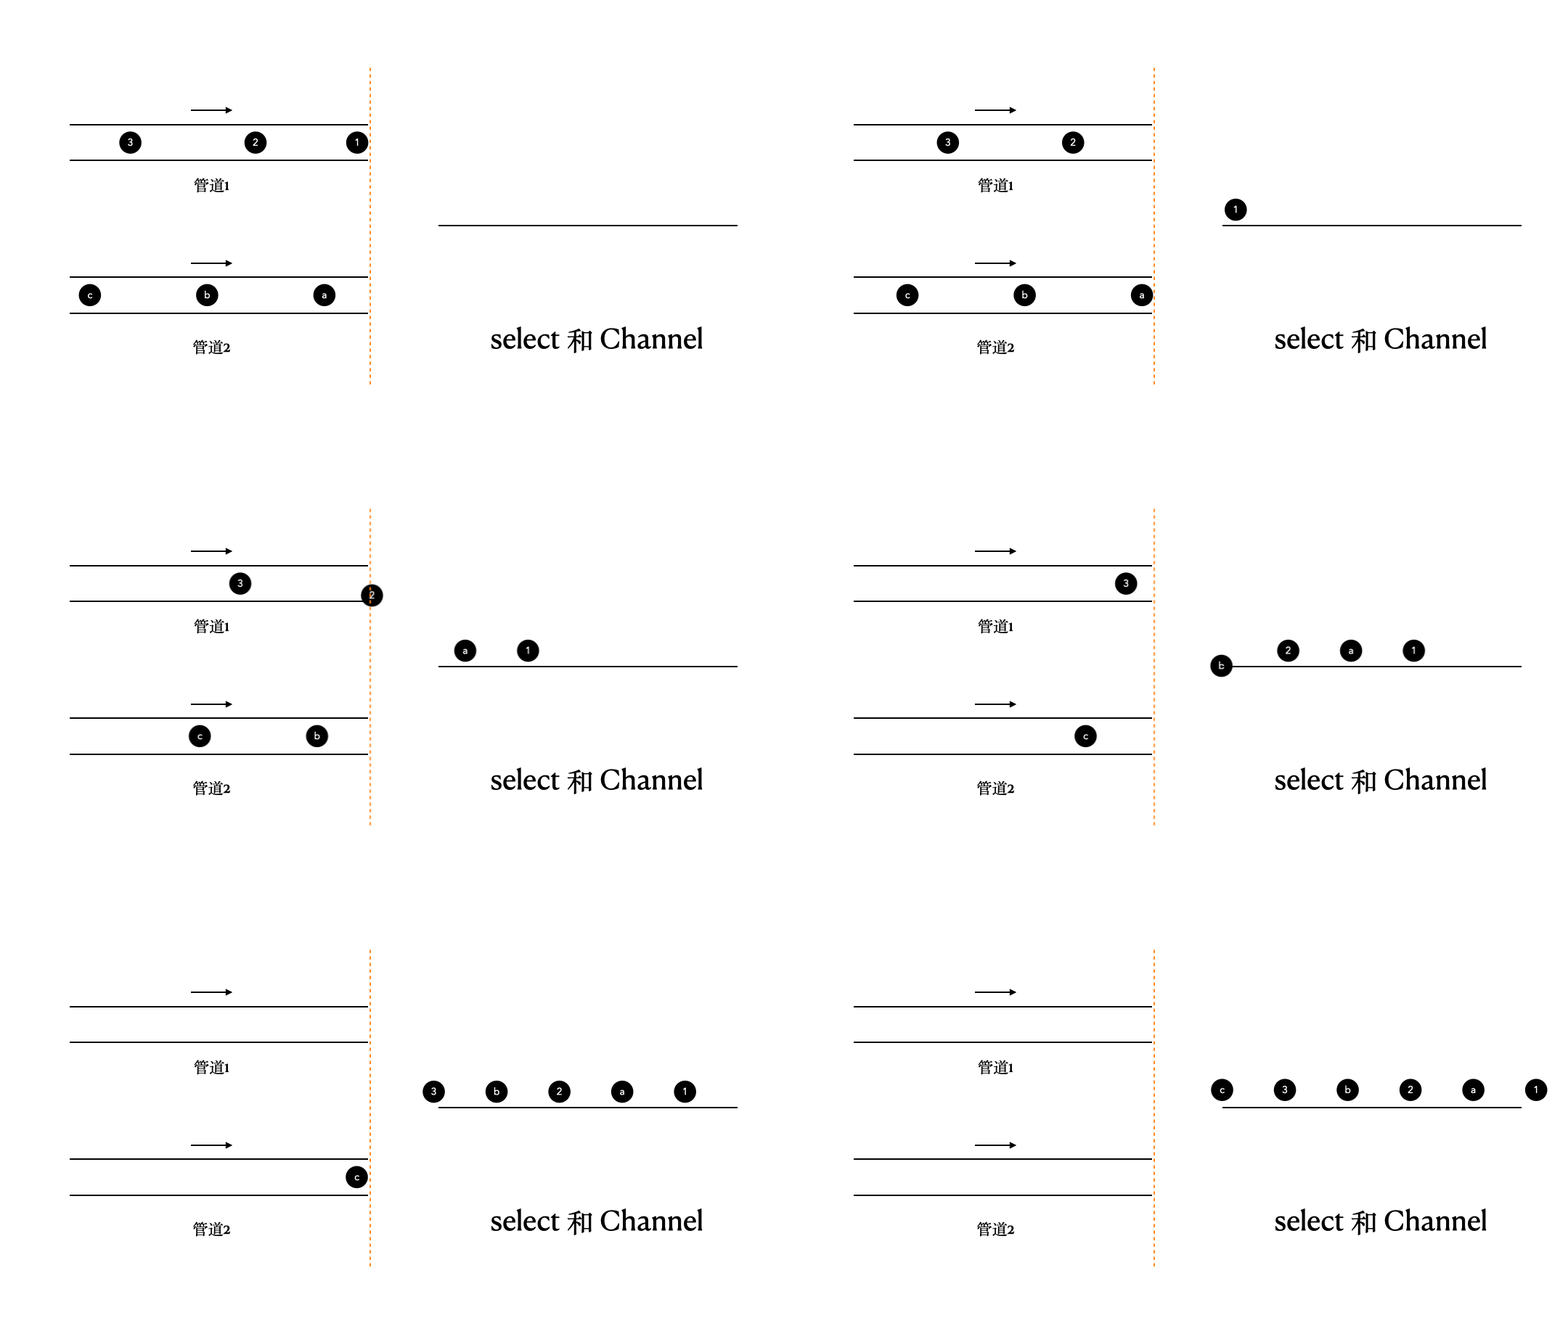
对于这个问题,如果我们不借助 select 来实现的话,其实可以大致做到,但结果不会令人满意。
// 代码段8
fun main() = runBlocking {
    val startTime = System.currentTimeMillis()
    val channel1 = produce {
        send(1)
        delay(200L)
        send(2)
        delay(200L)
        send(3)
        delay(150L)
    }

    val channel2 = produce {
        delay(100L)
        send("a")
        delay(200L)
        send("b")
        delay(200L)
        send("c")
    }

    channel1.consumeEach {
        println(it)
    }

    channel2.consumeEach {
        println(it)
    }

    println("Time cost: ${System.currentTimeMillis() - startTime}")
}

/*
输出结果
1
2
3
a
b
c
Time cost: 989
*/
可以看到,通过普通的方式,我们的代码是串行执行的,执行结果并不符合预期。channel1 执行完毕以后,才会执行 channel2,程序总体的执行时间,也是两者的总和。最关键的是,如果 channel1 当中如果迟迟没有数据的话,我们的程序会一直卡着不执行。
当然,以上的问题,我们通过其他方式也可以解决,但最方便的解决方案,还是 select。让我们来看看 select 与 Channel 搭配后,会带来什么样的好处。
// 代码段9
fun main() = runBlocking {
    val startTime = System.currentTimeMillis()
    val channel1 = produce {
        send("1")
        delay(200L)
        send("2")
        delay(200L)
        send("3")
        delay(150L)
    }

    val channel2 = produce {
        delay(100L)
        send("a")
        delay(200L)
        send("b")
        delay(200L)
        send("c")
    }

    suspend fun selectChannel(channel1: ReceiveChannel<String>, channel2: ReceiveChannel<String>): String = select<String> {
        // 1, 选择channel1
        channel1.onReceive{
            it.also { println(it) }
        }
        // 2, 选择channel1
        channel2.onReceive{
            it.also { println(it) }
        }
    }

    repeat(6){// 3, 选择6次结果
        selectChannel(channel1, channel2)
    }

    println("Time cost: ${System.currentTimeMillis() - startTime}")
}

/*
输出结果
1
a
2
b
3
c
Time cost: 540
*/
从程序的执行结果中,我们可以看到,程序的输出结果符合预期,同时它的执行耗时,也比代码段 8 要少很多。上面的代码中有几个注释,我们来看看:
注释 1 和 2,onReceive{} 是 Channel 在 select 当中的语法,当 Channel 当中有数据以后,它就会被回调,通过这个 Lambda,我们也可以将结果传出去。
注释 3,这里我们执行了 6 次 select,目的是要把两个管道中的所有数据都消耗掉。管道 1 有 3 个数据、管道 2 有 3 个数据,所以加起来,我们需要选择 6 次。
这时候,假设 channel1 出了问题,它不再产生数据了,我们看看程序会怎么样执行。
// 代码段10
fun main() = runBlocking {
    val startTime = System.currentTimeMillis()
    val channel1 = produce<String> {
        // 变化在这里
        delay(15000L)
    }

    val channel2 = produce {
        delay(100L)
        send("a")
        delay(200L)
        send("b")
        delay(200L)
        send("c")
    }

    suspend fun selectChannel(channel1: ReceiveChannel<String>, channel2: ReceiveChannel<String>): String = select<String> {
        channel1.onReceive{
            it.also { println(it) }
        }
        channel2.onReceive{
            it.also { println(it) }
        }
    }

    // 变化在这里
    repeat(3){
        selectChannel(channel1, channel2)
    }

    println("Time cost: ${System.currentTimeMillis() - startTime}")
}

/*
输出结果
a
b
c
Time cost: 533
*/
在上面的代码中,我们将 channel1 当中的 send() 都删除了,并且,repeat() 的次数变成了 3 次,因为管道里只有三个数据了。
这时候,我们发现,select 也是可以正常执行的。
不过,我们有时候可能并不清楚每个 Channel 当中有多少个数据,比如说,这里如果我们还是写 repeat(6) 的话,程序就会出问题了。
// 代码段11

// 仅改动这里
repeat(6){
    selectChannel(channel1, channel2)
}
/*
崩溃:
Exception in thread "main" ClosedReceiveChannelException: Channel was closed
*/
这时候,你应该就能反应过来了,由于我们的 channel2 当中只有 3 个数据,它发送完数据以后就会被关闭,而我们的 select 是会被调用 6 次的,所以就会触发上面的 ClosedReceiveChannelException 异常。
在 19 讲当中,我们学过 receiveCatching() 这个方法,它可以封装 Channel 的结果,防止出现 ClosedReceiveChannelException。类似的,当 Channel 与 select 配合的时候,我们可以使用 onReceiveCatching{} 这个高阶函数。
// 代码段12

fun main() = runBlocking {
    val startTime = System.currentTimeMillis()
    val channel1 = produce<String> {
        delay(15000L)
    }

    val channel2 = produce {
        delay(100L)
        send("a")
        delay(200L)
        send("b")
        delay(200L)
        send("c")
    }

    suspend fun selectChannel(channel1: ReceiveChannel<String>, channel2: ReceiveChannel<String>): String =
        select<String> {
            channel1.onReceiveCatching {
                it.getOrNull() ?: "channel1 is closed!"
            }
            channel2.onReceiveCatching {
                it.getOrNull() ?: "channel2 is closed!"
            }
        }

    repeat(6) {
        val result = selectChannel(channel1, channel2)
        println(result)
    }

    println("Time cost: ${System.currentTimeMillis() - startTime}")
}

/*
输出结果
a
b
c
channel2 is closed!
channel2 is closed!
channel2 is closed!
Time cost: 541
程序不会立即退出
*/
这时候,即使我们不知道管道里有多少个数据,我们也不用担心崩溃的问题了。在 onReceiveCatching{} 这个高阶函数当中,我们可以使用 it.getOrNull() 来获取管道里的数据,如果获取的结果是 null,就代表管道已经被关闭了。
不过,上面的代码仍然还有一个问题,那就是,当我们得到所有结果以后,程序不会立即退出,因为我们的 channel1 一直在 delay()。这时候,当我们完成 6 次 repeat() 调用以后,我们将 channel1、channel2 取消即可。
// 代码段13

fun main() = runBlocking {
    val startTime = System.currentTimeMillis()
    val channel1 = produce<String> {
        delay(15000L)
    }

    val channel2 = produce {
        delay(100L)
        send("a")
        delay(200L)
        send("b")
        delay(200L)
        send("c")
    }

    suspend fun selectChannel(channel1: ReceiveChannel<String>, channel2: ReceiveChannel<String>): String =
        select<String> {
            channel1.onReceiveCatching {
                it.getOrNull() ?: "channel1 is closed!"
            }
            channel2.onReceiveCatching {
                it.getOrNull() ?: "channel2 is closed!"
            }
        }

    repeat(6) {
        val result = selectChannel(channel1, channel2)
        println(result)
    }

    // 变化在这里
    channel1.cancel()
    channel2.cancel()

    println("Time cost: ${System.currentTimeMillis() - startTime}")
}
这时候,我们对比一下代码段 13 和代码段 10 的话,就会发现程序的执行效率提升的同时,扩展性和灵活性也更好了。
提示:这种将多路数据以非阻塞的方式合并成一路数据的模式,在其他领域也有广泛的应用,比如说操作系统、Java NIO(Non-blocking I/O),等等。如果你能理解这个案例中的代码,相信你对操作系统、NIO 之类的技术也会有一个新的认识。
思考与实战
如果你足够细心的话,你会发现,当我们的 Deferred、Channel 与 select 配合的时候,它们原本的 API 会多一个 on 前缀。
public interface Deferred : CoroutineContext.Element {
    public suspend fun join()
    public suspend fun await(): T

    // select相关
    public val onJoin: SelectClause0
    public val onAwait: SelectClause1<T>
}

public interface SendChannel<in E>
    public suspend fun send(element: E)

    // select相关
    public val onSend: SelectClause2<E, SendChannel<E>>

}

public interface ReceiveChannel<out E> {
    public suspend fun receive(): E

    public suspend fun receiveCatching(): ChannelResult<E>
    // select相关
    public val onReceive: SelectClause1<E>
    public val onReceiveCatching: SelectClause1<ChannelResult<E>>
}
所以,只要你记住了 Deferred、Channel 的 API,你是不需要额外记忆 select 的 API 的,只需要在原本的 API 的前面加上一个 on 就行了。
另外你要注意,当 select 与 Deferred 结合使用的时候,当并行的 Deferred 比较多的时候,你往往需要在得到一个最快的结果以后,去取消其他的 Deferred。
比如说,对于 Deferred1、Deferred2、Deferred3、Deferred4、Deferred5,其中 Deferred2 返回的结果最快,这时候,我们往往会希望取消其他的 Deferred,以节省资源。那么在这个时候,我们可以使用类似这样的方式:
fun main() = runBlocking {
    suspend fun <T> fastest(vararg deferreds: Deferred<T>): T = select {
        fun cancelAll() = deferreds.forEach { it.cancel() }

        for (deferred in deferreds) {
            deferred.onAwait {
                cancelAll()
                it
            }
        }
    }

    val deferred1 = async {
        delay(100L)
        println("done1")    // 没机会执行
        "result1"
    }

    val deferred2 = async {
        delay(50L)
        println("done2")
        "result2"
    }

    val deferred3 = async {
        delay(10000L)
        println("done3")    // 没机会执行
        "result3"
    }

    val deferred4 = async {
        delay(2000L)
        println("done4")    // 没机会执行
        "result4"
    }

    val deferred5 = async {
        delay(14000L)
        println("done5")    // 没机会执行
        "result5"
    }

    val result = fastest(deferred1, deferred2, deferred3, deferred4, deferred5)
    println(result)
}

/*
输出结果
done2
result2
*/
所以,借助这样的方式,我们不仅可以通过 async 并发执行协程,也可以借助 select 得到最快的结果,而且,还可以避免不必要的资源浪费。
小结
好,这节课的内容就到这儿了,我们来做一个简单的总结。
select,就是选择“更快的结果”。
当 select 与 async、channel 搭配以后,我们可以并发执行协程任务,可以大大提升程序的执行效率,提升用户体验,并且还可以改善程序的扩展性、灵活性。
关于 select 的 API,我们完全不需要去刻意记忆,我们只需要在 Deferred、Channel 的 API 基础上加上 on 这个前缀即可。
最后,我们还结合实战,分析了 select 与 async 产生太多并发协程的时候,我们还可以定义个类似 fastest() 方法,去统一取消剩余的协程任务。这样的做法,可以大大节省计算资源,从而平衡性能与功耗。
其实,和 Kotlin 的 Channel 一样,select 并不是 Kotlin 独创的概念。select 在很多编程语言当中都有类似的实现,比如 Go、Rust,等等。在这些计算机语言当中,select 的语法可能与 Kotlin 的不太一样,但背后的核心理念都是“选择更快的结果”。
所以,只要你掌握了 Kotlin 的 select,今后学习其他编程语言的 select,都不再是问题。
思考题
前面我们已经说过,select 的 API,只需要在 Deferred、Channel 原本 API 的基础上加一个 on 前缀即可。比如 onAwait{}。那么,你有没有觉得它跟我们前面学的 onStart{}、onCompletion{} 之类的回调 API 很像?
你能从中悟出 select 的实现原理吗? 欢迎在留言区说说你的想法,也欢迎你把今天的内容分享给更多的朋友。
COMMUNITY NOTES
读者评论
这篇文章暂时没有读者留言。